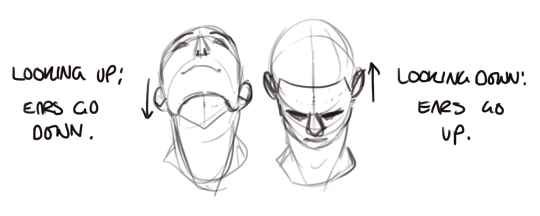
little art tip: the position of the ears on a human does a lot to communicate the angle of the head—whether it’s tilted forward or back.
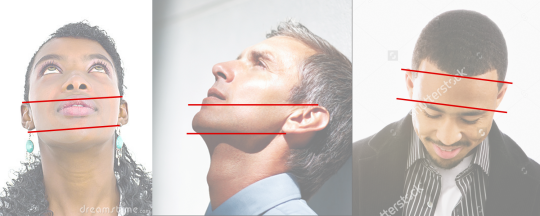
tilted back with the chin forward, the ears are going to look lower down, closer to the mouth; tilted forward with the chin tucked, the ears look higher up & more in line with the eyes.
Sorry I’m not hijacking, but this is a really good tip if people don’t know this. Like it does look really strange at first, but it is more realistic than drawing them in the centre of the side plane of the head. So it looks like this;;;
my bud @napping-neurotic wanted to know how i painted clouds so here’s a tutorial for everyone else too!
i used clip studio paint and the brushes can be downloaded from the clip studio app that’s included with the program, tho you can do this with any brush too!
Late last year I wanted to start a series of short tutorials called Tip Jar, as a way of saying thanks to my fans and giving back to my patrons. This is the first of the series I have made, showing my technique on quickly filling in lineart so you can get to painting without coloring outside the lines faster.
Someday I hope to turn these into video tutorials when I have the income and the time, but for now I hope that I will be able to share useful tips in this infographic format.
Worth sharing because this is exaaaaactly how I do my flats! I get this question all the time when I post my process videos, and this explains it far more succinctly than I ever could. 🙂
draw fast. it’ll look messy for a long time but you’ll improve faster than if you spend 4 hours on every drawing
if you draw in pencil and have a habit of erasing all of your mistakes, try drawing in pen or marker. i know it’s scary but it’ll help in the long run (i’m speaking from experience)
try different methods and mediums but don’t worry about mastering any of them, just have fun
if you’re not rich, buy art supplies from the dollar store, not the art store (seriously. i go through a sketchbook about once a month and i’d rather spend $4 on one than $15)
there’s no wrong way to learn. you can copy other people’s art if you want to, just don’t post it
DO NOT worry about having a consistent style. do not. just draw however you want
if you want to make original characters then do it. don’t worry about if they’re original, or a good design, or if they have an accompanying story. make sonic ocs. do it. it’s fun and it’s not hurting anyone
try not to kill your back. stand up and stretch once in a while
make a folder and save all of your favorite arts for inspiration
draw from life. draw your dog. draw your teachers. draw your desk. draw your own hands (seriously that’s the best way to get better at drawing hands)
in general, drawing from life or a photo is better than drawing from a diagram
draw whatever you want. draw youtubers if you like youtubers. draw undertale if you like undertale. when i was a kid i drew nothing but shadow the hedgehog and horses. everyone deserves to draw what they want without being mocked, and if people start making fun of you, block them and keep drawing
don’t expect to get any notes at first. don’t let it discourage you. if you want validation go show your art to your mom or your friends or your teacher or your grandma
Finally sat down and completed part 2 of the hair tutorial. Here I discuss how to draw hairstyles for female characters, although I think it can be applied for male characters as well. I mean..hair is hair xD
I didn’t cover how to draw hairstyles that are tied or braided or styled in a special way as I thought the post would be way too long. So I’ll be saving that for another day. If you have any questions just drop me a message or leave a reply and I’ll do my best to get back to you. Hope everyone has fun learning to draw hair as much as I did putting this together 😀
And I just want to say a big thank you to all of those who checked out part 1. I’ll leave a link in case anyone needs it
